网络模型构建
1. nn.Sequential和nn.ModuleList的区别
简而言之就是,nn.Sequential类似于Keras中的贯序模型,它是Module的子类,在构建数个网络层之后会自动调用forward()方法,从而有网络模型生成。而nn.ModuleList仅仅类似于pytho中的list类型,只是将一系列层装入列表,并没有实现forward()方法,因此也不会有网络模型产生的副作用。两者使用的一个很好的例子如链接:https://www.cnblogs.com/hellcat/p/8477195.html
另外需要注意的是,网络中需要训练的参数一定要被正确地注册,比如如果使用了普通list, dict等,之后一定要用nn.Sequential或者nn.ModuleList包装一下;甚至在定义网络时,网络的一个attribute是一个list, list里面是一个或者多个子网络Module类别,也依然需要用nn.ModuleList替换掉这个普通的list,这样才能将模型参数和子网络模型参数顺利被优化器识别。否则,运行时不会报错,但是没有被注册的参数将不会被训练!并且,只有被正确注册之后,我们用model.cuda(),这些参数才会被自动迁移到GPU上,否则只会停留在CPU上。
2. nn.ModuleList可以由多维下标索引,但用嵌套的list初始化时需注意
注意: 比如下面self.outs定义了具有二维索引的modulelist,需要注意的是,内层list也要加nn.ModuleList包装,这样内层list内部就是可迭代的Module subclass对象, 否则内层就是普通的list,不满足输入参数的类型要求,pytorch不能正确识别它们是可训练的模型参数,会报错。
class PoseNet(nn.Module):
    def __init__(self, nstack, inp_dim, oup_dim, bn=False, increase=128, **kwargs):
        """ Pack or initialize the trainable parameters of the network"""
        super(PoseNet, self).__init__()
        self.pre = nn.Sequential(
            Conv(3, 64, 7, 2, bn=bn),
            Conv(64, 128, bn=bn),
            nn.MaxPool2d(2, 2))

        self.outs = nn.ModuleList(
            [nn.ModuleList([Conv(inp_dim, oup_dim, 1, relu=False, bn=False) for j in range(4)]) for i in range(nstack)])
网络结构可视化
1. 网络结构可视化
def make_dot(var, params=None):
    """ Produces Graphviz representation of PyTorch autograd graph
    Blue nodes are the Variables that require grad, orange are Tensors
    saved for backward in torch.autograd.Function
    Args:
        var: output Variable
        params: dict of (name, Variable) to add names to node that
            require grad (TODO: make optional)
    """
    if params is not None:
        assert isinstance(params.values()[0], Variable)
        param_map = {id(v): k for k, v in params.items()}

    node_attr = dict(style='filled',
                     shape='box',
                     align='left',
                     fontsize='12',
                     ranksep='0.1',
                     height='0.2')
    dot = Digraph(node_attr=node_attr, graph_attr=dict(size="12,12"))
    seen = set()

    def size_to_str(size):
        return '(' + (', ').join(['%d' % v for v in size]) + ')'

    def add_nodes(var):
        if var not in seen:
            if torch.is_tensor(var):
                dot.node(str(id(var)), size_to_str(var.size()), fillcolor='orange')
            elif hasattr(var, 'variable'):
                u = var.variable
                name = param_map[id(u)] if params is not None else ''
                node_name = '%s\n %s' % (name, size_to_str(u.size()))
                dot.node(str(id(var)), node_name, fillcolor='lightblue')
            else:
                dot.node(str(id(var)), str(type(var).__name__))
            seen.add(var)
            if hasattr(var, 'next_functions'):
                for u in var.next_functions:
                    if u[0] is not None:
                        dot.edge(str(id(u[0])), str(id(var)))
                        add_nodes(u[0])
            if hasattr(var, 'saved_tensors'):
                for t in var.saved_tensors:
                    dot.edge(str(id(t)), str(id(var)))
                    add_nodes(t)

    add_nodes(var.grad_fn)
    return dot
使用以上代码的例子
1 | # plot the model |
2. 类似于keras, 打印网络每层输出的形状shape
更新:推荐使用增强版工具 torchsummaryX,它可以同时给出输出shape,参数数目,以及乘加运算数目等
Improved visualization tool of torchsummary. Here, it visualizes kernel size, output shape, # params, and Mult-Adds. Also the torchsummaryX can handle RNN, Recursive NN, or model with multiple inputs.
使用模仿keras中的summary()函数,torchsummary 转载自
import torch
import torch.nn as nn
import torch.nn.functional as F
from torchsummary import summary

class Net(nn.Module):
    def __init__(self):
        super(Net, self).__init__()
        self.conv1 = nn.Conv2d(1, 10, kernel_size=5)
        self.conv2 = nn.Conv2d(10, 20, kernel_size=5)
        self.conv2_drop = nn.Dropout2d()
        self.fc1 = nn.Linear(320, 50)
        self.fc2 = nn.Linear(50, 10)

    def forward(self, x):
        x = F.relu(F.max_pool2d(self.conv1(x), 2))
        x = F.relu(F.max_pool2d(self.conv2_drop(self.conv2(x)), 2))
        x = x.view(-1, 320)
        x = F.relu(self.fc1(x))
        x = F.dropout(x, training=self.training)
        x = self.fc2(x)
        return F.log_softmax(x, dim=1)
1 | device = torch.device("cuda" if torch.cuda.is_available() else "cpu") # PyTorch v0.4.0 |
3. pytorch中layer的输出shape的尺寸取整
默认使用的是向下取整(floor),如:
self.conv8_2 = nn.Conv2d(256, 512, kernel_size=3, padding=1, stride=2)  # (batch_size, 512, 38, 38)

# (H + 2*p - d(ks - 1) - 1) / 2 + 1
# (38 + 12 - 6*(3 - 1) -1 ) / 2 + 1 = 19.5 向下取整 19
self.conv6 = nn.Conv2d(512, 1024, kernel_size=3, padding=6, dilation=6)  # (batch_size, 1024, 19, 19)
Maxpooling层也是默认使用向下取整。如果想使用向上取整(ceil),需要设置取整模式 ceil_mode=True, 默认是False
nn.MaxPool2d(kernel_size=2, stride=2), # (batch_size, 256, 37, 37), 想变成38*38可以使用 ceil_mode=True
4. 超级给力的网络结构可视化工具:Netron 和 hiddenlayer
前者是一款在浏览器中使用的可视化工具,可以使用pip安装,然后在命令行中输入netron或者netron -b [model file]。需要把模型转换onnx模型。
import torch.onnx

net = Hourglass2(2, 32, 1, Residual)
dummy_input = Variable(torch.randn(1, 32, 128, 128))
torch.onnx.export(net, dummy_input, "model.onnx")
后者是在jupyter notebook内使用的,例子如下:
Netron: https://github.com/lutzroeder/netron
hiddenlayer: https://github.com/waleedka/hiddenlayer/blob/master/demos/pytorch_graph.ipynb
5. 计算网络模型的参数量和浮点运算数
使用第三方库thop
from thop import profile
from thop import clever_format

dummy_input = torch.randn(1, 256, 128, 128)
flops, params = profile(MyNetwork, inputs=(dummy_input,))
flops, params = clever_format([flops, params], "%.3f")
print(flops, params)
Tensor的操作
1. Tensor.view和Tensor.permute (permute:变换)
torch中的view类似与numpy中的reshape,但不同的是前者会与变换后的tensor共享内存,而后者不共享不会影响原始数组。PyTorch在0.4版本以后提供了reshape方法,实现了类似于 tensor.contigous().view(*args)的功能,如果不关心底层数据是否使用了新的内存,则使用reshape方法更方便。
torch中的permute类似与numpy中的transpose. 注意:view只能用在contiguous的variable上。如果在view之前用了transpose, permute等,需要用contiguous()来返回一个contiguous copy。
一个在SSD中的例子:
 y_loc = self.loc_layers[i](x)
            batch_size = y_loc.size(0)  # int
            # 此处y_loc的shape是(batch_size, anchor*4, Hi, Wi), pytorch的数据结构为(N, C, H, W)
            y_loc = y_loc.permute(0, 2, 3, 1).contiguous()
            # 此处y_loc的shape是(batch_size, Hi, Wi, anchor*4)
            # 要先把4放到最后,然后再改变shape 变成 ##### (batch_size, anchor_all_number, 4) ######,  anchor_all_number代表anchor的总数
            # permute可以对任意高维矩阵进行转置. 但没有 torch.permute() 这个调用方式, 只能 Tensor.permute()。
            # view只能用在contiguous的variable上。如果在view之前用了transpose, permute等,需要用contiguous()来返回一个contiguous copy。
            y_loc = y_loc.view(batch_size, -1, 4)
2. 若前面有一个tensor输入需要梯度,则后面的输出也需要梯度
x = torch.zeros((1), requires_grad=True)
# 若前面有一个输入需要梯度,则后面的输出也需要梯度。有的版本这里是默认值false
# 注: Tensor变量的requires_grad的属性默认为False,若一个节点requires_grad被设置为True,那么所有依赖它的节点的requires_grad都为True。
3. Tensor之间要是同一个数据类型dtype才能运算,因此有时需要进行类型转换
比如即便都是int类型,但是一个是int16,一个是int32也需要先转换然后才能进行运算。使用Tensor.to(torch.float32)进行转换。
# 因为loc_loss是float32,而num_matched_box是int64,没办法直接除所以转换一下
# 这里是不会损失数据的,因为假如batch_size=32,每个图片8732个,就只有8732*32=279424
# num_matched_boxes最大的值不会超过float32的表示范围的
num_matched_boxes = num_matched_boxes.to(torch.float32)  # Tensor dtype and/or device 转换
loc_loss /= num_matched_boxes   # 除以的是正样本的数目
4. Tensor的clone和copy_的区别:
copy_()不会追踪梯度,而clone会追踪并进行梯度的反向传播
Unlike copy_(), clone is recorded in the computation graph. Gradients propagating to the cloned tensor will propagate to the original tensor.
5. Tensor初始化
a. torch.tensor和torch.from_numpy()效果不同
torch.tensor会重新拷贝原始数据,返回新的数据。如果不想拷贝,即内存相关联,对numpy array来说可以使用torch.from_numpy()。
可以直接用list数据进行初始化,并且对list中某一个元素是tuple还是list都无所谓,如:
x= [(1,2,3,4), [5,6,7,8]] # x[0]是tuple而x[1]是list
torch.tensor(x)
Out[20]:
tensor([[ 1, 2, 3, 4],
[ 5, 6, 7, 8]])
6. data和detach()的区别
推荐使用detach(),这样万一需要在反向传播时需要记录变量,可以报错指出,避免Tensor.data没有报错,但是计算错误的情况。
https://zhuanlan.zhihu.com/p/38475183
“However, .data can be unsafe in some cases. Any changes on x.data wouldn’t be tracked by autograd, and the computed gradients would be incorrect if x is needed in a backward pass. A safer alternative is to use x.detach(), which also returns a Tensor that shares data with requires_grad=False, but will have its in-place changes reported by autograd if x is needed in backward.”
Any in-place change on x.detach() will cause errors when x is needed in backward, so .detach() is a safer way for the exclusion of subgraphs from gradient computation. https://github.com/pytorch/pytorch/issues/6990
7. pytorch中损失函数对tensor操作的reduce,size_average参数说明
参考:https://blog.csdn.net/u013548568/article/details/81532605
以及 https://zhuanlan.zhihu.com/p/91485607
size_average是说是不是对一个batch里面的所有的数据求均值
| Reduce | size_average | result |
|---|---|---|
| True | True | 对batch里面的数据取均值 |
| True | False | 对batch里面的数据求和 |
| False | - | returns a loss per batch element instead,这个时候忽略size_average参数 |
假设输入和target的大小分别是NxCxWxH,那么一旦reduce设置为False,loss的大小为NxCxWxH,返回每一个元素的loss
reduction代表了上面的reduce和size_average双重含义,这也是文档里为什么说reduce和size_average要被Deprecated 的原因
例子:
import torch
import torch.nn as nn

# ----------------------------------- MSE loss

# 生成网络输出 以及 目标输出
output = torch.ones(2, 2, requires_grad=True) * 0.5
target = torch.ones(2, 2)

# 设置三种不同参数的L1Loss
reduce_False = nn.MSELoss(size_average=True, reduce=False) # 等效于reduction='none'
size_average_True = nn.MSELoss(size_average=True, reduce=True) # 等效于reduction='mean'
size_average_False = nn.MSELoss(size_average=False, reduce=True) # 等效于reduction='sum'

o_0 = reduce_False(output, target)
o_1 = size_average_True(output, target)
o_2 = size_average_False(output, target)

print('\nreduce=False, 输出同维度的loss:\n{}\n'.format(o_0))
print('size_average=True,\t求平均:\t{}'.format(o_1))
print('size_average=False,\t求和:\t{}'.format(o_2))
输出:
reduce=False, 输出同维度的loss:
tensor([[0.2500, 0.2500],
        [0.2500, 0.2500]], grad_fn=<MseLossBackward>)

size_average=True,    求平均:    0.25

size_average=False,    求和:    1.0
8. 将tensor以及model迁移至cuda上
将数据迁移到cuda上必须reassign,tensor.cuda()不是in-place操作,而是返回一个新的在cuda上的tensor。而网络模型不需要reassign.
a. 迁移tensor
问题:Hi, this works, a = torch.LongTensor(1).random_(0, 10).to("cuda"). but this won’t work:
回答:
If you are pushing tensors to a device or host, you have to reassign them:
a = a.to(device='cuda')
b. 迁移模型
nn.Modules push all parameters, buffers and submodules recursively and don’t need the assignment.
model.cuda()
9. 对feature map (即也是tensor)做尺寸上的缩放
torch.nn.functional.``interpolate(input, size=None, scale_factor=None, mode=’nearest’, align_corners=None)
默认的align_corners=None就是和Opencv中的缩放规则保持一致,默认使用几何中心对齐,以此消除量化误差(或者说计算出的灰度值也相对于源图像偏左偏上)。
若做缩放,需要在缩放后图像 的位置上找到对应的 原始图像位置上 的像素值,有以下
SrcX=(dstX+0.5)* (srcWidth/dstWidth) -0.5
SrcY=(dstY+0.5) * (srcHeight/dstHeight)-0.5
具体参考我的另一篇博客:
https://blog.csdn.net/xiaojiajia007/article/details/100150726
10. 注册参数—模型的普通类成员变量和Pytorch中自动注册的Parameter或者buffer区别
https://zhuanlan.zhihu.com/p/89442276
同时参考 第一节#网络模型构建中nn.ModuleList
模型中需要保存下来的参数包括两种:
一种是反向传播需要被optimizer更新的,称之为 parameter
一种是反向传播不需要被optimizer更新,称之为 buffer,它只能在forward中被更新。
第一种参数我们可以通过 model.parameters() 返回;第二种参数我们可以通过 model.buffers() 返回。因为我们的模型保存的是 state_dict 返回的 OrderDict,所以这两种参数不仅要满足是否需要被更新的要求,还会被保存到OrderDict。而普通的类成员变量属性是无法自动保存到模型的 OrderDict中去的。
模型进行设备移动时,模型中注册的参数(Parameter和buffer)会同时进行移动,比如使用model.cuda()之后注册的参数parameter和buffer会自动迁移到cuda上去,而普通成员变量不会自动设备移动。
11. Tensor的缩放
使用functional.interpolate函数对Tensor进行缩放,注意,bicubic插值算法只能对4-D Tensor正常操作,如果是3-D操作,需要先扩展纬度之后再进行。下面例子中,hmps是一个shape=(N, C, H, W)的张量,bicubic默认会对最后两个维度进行缩放插值,而batch size and channels (dim0, dim1)不变。即把张量的空间分辨率(长和宽)放大。
1 | sizeHW = (args.square_length, args.square_length) # 设square_length是hmps的4倍 |
12. Tensor的contiguous、storage、stride
Pytorch中的Size, storage offset, stride概念
contiguous直观的解释是Tensor底层一维数组元素的存储顺序与Tensor按行优先一维展开的元素顺序是否一致。pytorch中的storage指的是连续的内存块,而tensor则是映射到storage的视图,他把单条的内存区域映射成了n维的空间视图。size是tensor的维度,storage offset是数据在storage中的开头索引,stride是storage中对应于tensor的相邻维度间第一个索引的跨度。示例详情见链接。
如何判断索引或者切片是对原始Tensor的view(共享内存)还是copy?
umpy array 以及pytorch tensor 的索引(切片索引,整型索引)
简而言之
基本的切片索引(slice)是对原始数组的一个view,会影响原始数组的。而后者情况比较复杂,不过是basic indexing,则依然是原始数组的一个view,如果是advanced indexig,会用原始数组创建一个新的数组,不会影响原始数据。
x[1, 3:8], x[2:5, 6:9]是基本slice索引,是view共享内存的;而x[1,2]是基本integer索引, x[[1,2], [1,4]]是高级integer索引。
针对pytorch tensor可以通过data_ptr()查看第一个元素地址是否相同来判断
full list of view ops in PyTorch
as_strided()detach()diagonal()expand()expand_as()movedim()narrow()permute()select()squeeze()transpose()t()Trealimagview_as_real()view_as_imag()unflatten()unfold()unsqueeze()view()view_as()unbind()split()split_with_sizes()chunk()indices()(sparse tensor only)values()(sparse tensor only)It’s also worth mentioning a few ops with special behaviors:
reshape(),reshape_as()andflatten()can return either a view or new tensor, user code shouldn’t rely on whether it’s view or not.contiguous()returns itself if input tensor is already contiguous, otherwise it returns a new contiguous tensor by copying data.
Numpy中的判断准则
Pytorch的行为是模仿Numpy的,numpy提供了详细的说明,什么时候是view,什么时候是copy:
https://numpy.org/doc/stable/reference/arrays.indexing.html
Advanced indexing is triggered when the selection object, obj, is a non-tuple sequence object, an
ndarray(of data type integer or bool), or a tuple with at least one sequence object or ndarray (of data type integer or bool). There are two types of advanced indexing: integer and Boolean.Advanced indexing always returns a copy of the data (contrast with basic slicing that returns a view).
具体说明参加上面链接
pytorch训练数据准备
1. DataLoader 类
参数说明 摘录自
1. dataset:加载的数据集(Dataset对象)
- batch_size:batch size
- shuffle::是否将数据打乱
- sampler: 样本抽样,后续会详细介绍
- num_workers:使用多进程加载的进程数,0代表不使用多进程
- collate_fn: 如何将多个样本数据拼接成一个batch,一般使用默认的拼接方式即可,即默认调用default_collate,但是如果数据异常往往无法自动处理而报错
- pin_memory:是否将数据保存在pin memory区,pin memory中的数据转到GPU会快一些
- drop_last:dataset中的数据个数可能不是batch_size的整数倍,drop_last为True会将多出来不足一个batch的数据丢弃
对于 pin_memory 的解释:摘录自
pin_memory就是锁页内存
pin_memory就是锁页内存,创建DataLoader时,设置pin_memory=True,则意味着生成的Tensor数据最开始是属于内存中的锁页内存,这样将内存的Tensor转义到GPU的显存就会更快一些。
主机中的内存,有两种存在方式,一是锁页,二是不锁页,锁页内存存放的内容在任何情况下都不会与主机的虚拟内存进行交换(注:虚拟内存就是硬盘),而不锁页内存在主机内存不足时,数据会存放在虚拟内存中。显卡中的显存全部是锁页内存,当计算机的内存充足的时候,可以设置pin_memory=True。当系统卡住,或者交换内存使用过多的时候,设置pin_memory=False。因为pin_memory与电脑硬件性能有关,pytorch开发者不能确保每一个炼丹玩家都有高端设备,因此pin_memory默认为False。
collate_fn的作用,和默认的default_collate
这个函数的决定如何将多个样本数据拼接成一个batch,一般使用默认的拼接方式即可,即默认调用default_collate,它会自动地把__getitem__生成的单个张量,数字,字符串,列表,字典等进行串联拼接成batch的数据。但是如果数据异常往往无法自动处理而报错。比如如果我们读取图片失败,default_collate自动处理时就会报错:
TypeError: batch must contain tensors, numbers, dicts or lists; found
这个时候需要靠我们自定义collate_fn,返回的batch数据会自定清理掉不合法的数据,并且我们还可以通过自己的collate_fn自由地对dataloader生产的batch数据做各种选择处理。
2. 多进程读取HDF5文件支持的不好以及解决办法
DataLoader中多进程高效处理hdf5文件:
My recommendations:
- Use HDF5 in version 1.10 (better multiprocessing handling),
- Because an opened HDF5 file isn’t pickleable and to send Dataset to workers’ processes it needs to be serialised with pickle, you can’t open the HDF5 file in
__init__. Open it in__getitem__and store as the singleton!. Do not open it each time as it introduces huge overhead.- Use
DataLoaderwithnum_workers> 0 (reading from hdf5 (i.e. hard drive) is slow) andbatch_sampler(random access to hdf5 (i.e. hard drive) is slow).
Sample code:
class H5Dataset(torch.utils.data.Dataset):
    def __init__(self, path):
        self.file_path = path
        self.dataset = None
        with h5py.File(self.file_path, 'r') as file:
            self.dataset_len = len(file["dataset"])

    def __getitem__(self, index):
        if self.dataset is None:
            self.dataset = h5py.File(self.file_path, 'r')["dataset"]
        return self.dataset[index]

    def __len__(self):
        return self.dataset_len
如何安装HDF5 1.10以及对应的python hdf5的包呢? 查看我的另一个博客
使用命令行环境变量HDF5_DIR=/usr/local/hdf5 pip install h5py。具体如下:
Then you should be fine. Install HDF5 1.10 from source into somewhere you want to. The .tar is here:
https://www.hdfgroup.org/HDF5/release/obtainsrc5110.html
Follow the install readme but basically you just need to give it a directory with:
> ./configure —prefix=/usr/local/h5py
before you make.
Now install with you anaconda version of python. You may want to make a separate environment using conda but that’s your call.
Remove the h5py you have with anaconda using
> conda uninstall h5py
or
> pip uninstall h5py
Then use pip to reinstall h5py but pointing to the HDF5 library you made from source. From here: http://docs.h5py.org/en/latest/build.html
> HDF5_DIR=/usr/local/hdf5 pip install h5py
Then you should be good. Open up a python terminal and test if you can use SWMR mode:
> import h5py
> f = h5py.File(“./swmr.h5”, ‘a’, libver=’latest’, swmr=True)
3. 多进程准备数据随机种子seed的问题
4. 如何加速训练数据准备并载入GPU训练
参考一个知乎博客,data_prefetcher: https://zhuanlan.zhihu.com/p/80695364
以及Pytorch论坛上的一个讨论: https://discuss.pytorch.org/t/how-to-prefetch-data-when-processing-with-gpu/548/19?u=jia_lee
Pytorch训练阶段
1. Stochastic Weight Averaging in PyTorch
这是一种model weight average策略,类似于模型集成,常常用来刷指标,提高模型的泛化精度。详细说明请见我的单独博客:
https://blog.csdn.net/xiaojiajia007/article/details/90748115
2. 通过梯度积累变相增大batch size
详情请见 PyTorch中在反向传播前为什么要手动将梯度清零? - Pascal的回答 - 知乎
但是需要注意的是,因为BN层的参数是在 forward()阶段更新的,这样积累梯度并没有增大BN layers的实际batch size。可以通过减少BN层的 momentum 值,让BN层动态更新统计参数时能够记住更长。
3. Pytorch+Apex+tensorboard+distributed training例子
综合使用的代码模板,原文仓库还包括如何同时显示多个实验的曲线,使用多节点分布式训练等等
Pytorch 测试阶段
1. 正确的测试(预测)时间计时代码
torch.cuda.synchronize() # 等待当前设备上所有流中的所有核心完成
start = time.time()
result = model(input)
torch.cuda.synchronize()
end = time.time()
在pytorch里面,程序的执行都是异步的。如果没有torch.cuda.synchronize() ,测试的时间会很短,因为执行完end=time.time()程序就退出了,后台的cu也因为python的退出退出了,如果采用torch.cuda.synchronize() ,代码会同步cu的操作,等待gpu上的操作都完成了再继续成形end = time.time()
如果将代码改为
1 | start = time.time() |
这时候会发祥第三段代码和第二段代码的时间是类似的,因为第三段代码会等待gpu上的结果执行完传给print函数,所以真个的时间就和第二段同步的操作的时间基本上是一致的了,将print(result)换成result.cpu()结果是一致的惹。
原文:https://blog.csdn.net/u013548568/article/details/81368019
2. 训练,测试两个阶段需要注意设置不同状态 参考
a. model.train()和model.val()
比如BN和Dropout
During eval Dropout is deactivated and just passes its input.
During the training the probability p is used to drop activations. Also, the activations are scaled with 1./p as otherwise the expected values would differ between training and eval.
drop = nn.Dropout()
x = torch.ones(1, 10)

# Train mode (default after construction)
drop.train()
print(drop(x))

# Eval mode
drop.eval()
print(drop(x))
b. 测试(val)时不光要设置model.eval() ,为了防止内存爆炸,应该追加torch.no_grad()
model.eval()will notify all your layers that you are in eval mode, that way, batchnorm or dropout layers will work in eval model instead of training mode.torch.no_grad():impacts the autograd engine and deactivate it. It will reduce memory usage and speed up computations but you won’t be able to backprop (which you don’t want in an eval script). 注意,torch.no_grad()是context manager。
3. Dropout里需要设置训练标志位,否则会踩坑
使用F.dropout ( nn.functional.dropout )的时候需要设置它的可选参数training state
这个状态参数与模型整体的一致,否则就是out=out,没有效果,具体说明见链接 查看
Class DropoutFC(nn.Module):
   def __init__(self):
       super(DropoutFC, self).__init__()
       self.fc = nn.Linear(100,20)

   def forward(self, input):
       out = self.fc(input)
       out = F.dropout(out, p=0.5, training=self.training) # set dropout's training sate
       return out

Net = DropoutFC()
Net.train()

# train the Net
#作者:雷杰
#链接:https://www.zhihu.com/question/67209417/answer/302434279
或者直接使用nn.Dropout(),即利用包装后的layer
nn.Dropout()实际上是对F.dropout的一个包装, 也将self.training传入了)
Class DropoutFC(nn.Module):
  def __init__(self):
      super(DropoutFC, self).__init__()
      self.fc = nn.Linear(100,20)
      self.dropout = nn.Dropout(p=0.5)

  def forward(self, input):
      out = self.fc(input)
      out = self.dropout(out)
      return out
Net = DropoutFC()
Net.train()

# train the Net
4. 多GPU模型权重的保存与加载
Instead of deleting the “module.” string from all the state_dict keys, you can save your model with:torch.save(model.module.state_dict(), path_to_file)
instead oftorch.save(model.state_dict(), path_to_file)
that way you don’t get the “module.” string to begin with…
# original saved file with DataParallel
state_dict = torch.load('myfile.pth.tar')
# 把所有的张量加载到CPU中
# torch.load('tensors.pt', map_location=lambda storage, loc: storage)

# create new OrderedDict that does not contain `module.`
from collections import OrderedDict
new_state_dict = OrderedDict()
for k, v in state_dict.items():
    name = k[7:] # remove `module.`
    new_state_dict[name] = v
# load params
model.load_state_dict(new_state_dict)

############## 还有一个可用的封装更好的函数
# 加载模型,解决命名和维度不匹配问题,解决多个gpu并行
def load_state_keywise(model, model_path):
    model_dict = model.state_dict()
    pretrained_dict = torch.load(model_path, map_location='cpu')
    key = list(pretrained_dict.keys())[0]
    # 1. filter out unnecessary keys
    # 1.1 multi-GPU ->CPU
    if (str(key).startswith('module.')):
        pretrained_dict = {k[7:]: v for k, v in pretrained_dict.items() if
                           k[7:] in model_dict and v.size() == model_dict[k[7:]].size()}
    else:
        pretrained_dict = {k: v for k, v in pretrained_dict.items() if
                           k in model_dict and v.size() == model_dict[k].size()}
    # 2. overwrite entries in the existing state dict
    model_dict.update(pretrained_dict)
    # 3. load the new state dict
    model.load_state_dict(model_dict)

 ################## 更简单直接的方式 ##################
# Instead of deleting the “module.” string from all the state_dict keys, you can save your model with:

torch.save(model.module.state_dict(), path_to_file)
# instead of

torch.save(model.state_dict(), path_to_file)

# that way you don’t get the “module.” string to begin with…
5. 恢复保存的优化器状态(optimizer checkpoint resume),继续优化
https://blog.csdn.net/xiaojiajia007/article/details/88417329
6. 载入模型权重GPU内存被额外占用的bug解决
分布式/多进程中的这种情况的现象是,对于同一个python进程(pid号相同)会两次占用固定大小的gpu内存
观察到的现象是python进程多于预期应有的进程数。比如我们单机多卡分布式训练,已经完成了网络模型的in-place参数设备转换,即network.cuda(),现在我们有4块GPU,我们在程序中的每一个进程分配一块GPU时本来应该只有4个进程,每个进程占用一定的GPU显存,但实际情况如所示:
Processes: GPU Memory |
| GPU PID Type Process name Usage |
|=============================================================================|
| 0 1291 G /usr/lib/xorg/Xorg 153MiB |
| 0 2549 G fcitx-qimpanel 14MiB |
| 0 21740 G compiz 138MiB |
| 0 22840 C /home/jia/.virtualenvs/phoenix/bin/python 6097MiB |
| 0 22841 C /home/jia/.virtualenvs/phoenix/bin/python 859MiB | # 本不该出现
| 0 22842 C /home/jia/.virtualenvs/phoenix/bin/python 859MiB | # 本不该出现
| 0 22843 C /home/jia/.virtualenvs/phoenix/bin/python 859MiB | # 本不该出现
| 0 23207 G /opt/teamviewer/tv_bin/TeamViewer 24MiB |
| 0 23985 G .../Software/pycharm-2019.2.4/jbr/bin/java 12MiB |
| 1 22841 C /home/jia/.virtualenvs/phoenix/bin/python 6129MiB |
| 2 22842 C /home/jia/.virtualenvs/phoenix/bin/python 6227MiB |
| 3 22843 C /home/jia/.virtualenvs/phoenix/bin/python 6229MiB
原因:在同一个cuda上之后不使用的内存将会被自动销毁并回收,但是对于不同GPU之间目前没有自动的内存管理机制??,如果某一个进程在cuda0上实例化的tensor x,在另一个使用cuda2的进程中使用了,但cuda2上的进程并没有对tensor x进行内存销毁回收,造成GPU内存的占用。
解决办法:在当前进程中销毁不在同一个cuda上的内存垃圾,或者载入权重时使用torch.load(model_path, map_location=’cpu’)
GPU预训练保存的权值可以直接载入到CPU下的网络模型network中,并且载入之后network的参数会移到预训练权值所在的device上
如下图所示:
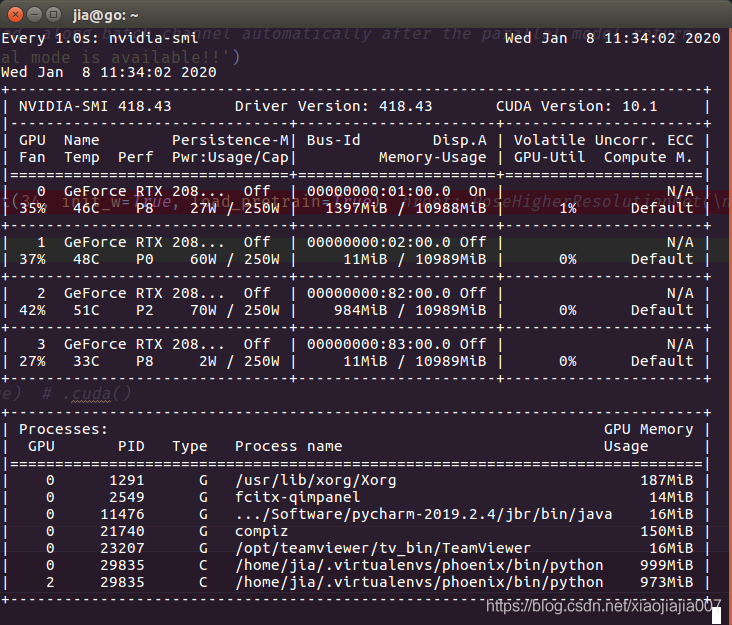
这个行为挺诡异,按照正常的设计逻辑,本来CPU的模型直接载入GPU预训练权值应该会因为device不同而报错(cpu, cuda0)但结果并没有,可以成功载入,并且载入之后CPU下的模型network的device也变成cuda0了。甚至我们可以仅仅载入某一layer的权值,那么这一layer的weight.data将变到cuda0上,而其没有载入更改的layer的weight.data仍然在cpu上!
解决办法同上一种情况,把GPU预训练权值map到cpu上之后再network.load_state_dict()。
Pytorch的内存优化和加速
有一个 pytorch提速指南: https://zhuanlan.zhihu.com/p/39752167
可以参考 原文
1. 使用inplace减少内存开辟,从而压缩内存需求
对于in-place operation的解读,见:https://blog.csdn.net/u012436149/article/details/80819523
以及:https://blog.csdn.net/york1996/article/details/81835873
如,ReLu(inplace=True)
在官方问文档中由这一段话:
如果你使用了in-place operation而没有报错的话,那么你可以确定你的梯度计算是正确的。因为Pytorch在内存占用和执行速度上做了很多算法优化,哪些需要保留梯度不能使用in-place覆盖就显得不那么显而易见了,不能单纯地用原始梯度反向传播过程来决定。
inplace只是可以节省存储tensor的内存,但是PYTORCH中的自动微分机制仍然能够追踪,对于内存来说inplace可能是同一个对象,但是对于autograd来说,依然是两个不同的对象。 一个例子:resnet
inplacemeans that it will not allocate new memory and change tensors inplace. But from the autograd point of view, you have two different tensors (even though they actually share the same memory). One is the output of conv (or batchnorm for resnet) and one is the output of the relu.
2. torch.backends.cudnn.benchmark = True
在程序刚开始加这条语句可以提升一点训练速度,没什么额外开销。
3. torch.cuda.empty_cache()
因为每次迭代都会引入点临时变量,会导致训练速度越来越慢,基本呈线性增长。开发人员还不清楚原因,但如果周期性的使用torch.cuda.empty_cache()的话就可以解决这个问题。
4. 使用checkpoint分阶段计算,这样可以在显卡上放下更大的网络
知乎回答的一个例子:https://www.zhihu.com/question/274635237/answer/574193034
5. 尝试Nvidia Apex 16位浮点数扩展
温馨提示:我的另一篇博客pip install, python setup.py, egg-info的说明—以Nvidia Apex安装为例
Clean the old install before rebuilding:
pip uninstall apex
cd apex_repo_dir
rm -rf build (if present)
rm -rf apex.egg-info (if present)
Install package:
pip install -v —no-cache-dir —global-option=”—cpp_ext” —global-option=”—cuda_ext” ./
# —no-cache-dir 清除安装缓存文件
或者
python setup.py install —cuda_ext —cpp_ext
ps: 如果遇到Cuda版本不兼容的问题,解决办法见:(若pytorch升级到1.3,cuda10.1则没有这个error了)
https://github.com/NVIDIA/apex/issues/350#issuecomment-500390952
如果没有出现其他error,可以直接使用上面链接的建议,删除版本检查抛出的报错。
讨论:
https://github.com/NVIDIA/apex/issues/350
https://github.com/NVIDIA/apex/pull/323
6. Pytorch内存泄露(僵尸进程)解决办法 原文链接
nvidia-smi 发现内存泄露问题,即没有进程时,内存被占用
fuser -v /dev/nvidia* 发现僵尸进程
ps x |grep python|awk ‘{print $1}’|xargs kill 杀死所有僵尸进程
命令解读:
ps x: show all process of current user
grep python: to get process that has python in command line
awk ‘{print $1}’: to get the related process pidxargs kill`: to kill the process
note: make sure you don’t kill other processes! do ps x |grep python first.
7. 相关的进程和内存管理bash cmd (命令行命令)
nvidia-smi -l xxx 监控GPU,动态刷新信息(默认5s刷新一次),按Ctrl+C停止,可指定刷新频率,以秒为单位;
watch -n 1 nvidia-smi 实时监控GPU;
watch -n 1 lscpu实时监控CPU,watch是周期性的执行下个程序
ps -elf进程查看,
ps -elf | grep python 查看Python子进程,这个也是命令比较实用,能够用在监视其他基于python解释器运行的进程,
kill -9 [PID]杀死进程PID。
watch -n 5 -t -d=cumulative ‘command’
watch是周期性的执行下个程序,并全屏显示执行结果
-n 每隔5秒周期执行一次
-t 开头的间隔时间和信息等不显示
-d=cumulative 发生变动的地方高亮
8. 如何才能使用 Tensor Core
Convolutions: For cudnn versions 7.2 and ealier, @vaibhav0195 is correct: input channels, output channels, and batch size should be multiples of 8 to use tensor cores. However, this requirement is lifted for cudnn versions 7.3 and later. For cudnn 7.3 and later, you don’t need to worry about making your channels/batch size multiples of 8 to enable Tensor Core use.
GEMMs (fully connected layers): For matrix A x matrix B, where A has size [I, J] and B has size [J, K], I, J, and K must be multiples of 8 to use Tensor Cores. This requirement exists for all cublas and cudnn versions. This means that for bare fully connected layers, the batch size, input features, and output features must be multiples of 8, and for RNNs, you usually (but not always, it can be architecture-dependent depending on what you use for encoder/decoder) need to have batch size, hidden size, embedding size, and dictionary size as multiples of 8.
9. Apex的Fused Adam的特点是模型参数更新迭代得比Pytorch中原生的Adam快
What is the difference between FusedAdam optimizer in Nvidia AMP package with the Adam optimizer in Pytorch?
The Adam optimizer in Pytorch (like all Pytorch optimizers) carries out optimizer.step() by looping over parameters, and launching a series of kernels for each parameter. This can require hundreds of small launches that are mostly bound by CPU-side Python looping and kernel launch overhead, resulting in poor device utilization. Currently, the FusedAdam implementation in Apex flattens the parameters for the optimization step, then carries out the optimization step itself via a fused kernel that combines all the Adam operations. In this way, the loop over parameters as well as the internal series of Adam operations for each parameter are fused such that optimizer.step() requires only a few kernel launches.
The current implementation (in Apex master) is brittle and only works with Amp opt_level O2. I’ve got a WIP branch to make it work for any opt_level (https://github.com/NVIDIA/apex/pull/351). I recommend waiting until this is merged then trying it.
10. torch.compile或OpenAI的Trition,甚至手写extension都是 PyTorch 中提高代码性能的有效工具
参考:如何利用torch.compile和手写extension提高代码性能? - 知乎回答
Pytorch 2.0新增的torch.compile 通过 JIT 将 PyTorch 代码编译成优化的内核,使 PyTorch 代码运行得更快,特点是使用方便简单,大部分过程仅需修改一行代码。不过这个方法需要首次运行时对模型进行编译会费时一点。
除了torch.compile之外,OpenAI发布的Trition也能够为Pytorch加速,可以直接使用Python编写算子,不需要C++,比手写CUDA算子要相对简单,但比torch.compile要复杂一些。
手写CUDA算子,需要掌握CUDA并行编程和Pytorch拓展规则,但是灵活度和提升上限也最高。
11. 其他可参考资源
Pytorch 使用陷阱,易错点
1. Tensor.expand, expand_as是共享内存的,只是原始数据的一个视图 view,并没有在扩展的axis上有新的数据复制,牵一发动全身!
为了避免对 expand() 后对某个channel操作会影响原始tensor的全部元素,需要使用clone()
如果没有clone(),对mask_miss的某个通道赋值后,所有通道上的tensor都会变成1!
# Notice! expand does not allocate more memory but just make the tensor look as if you expanded it.
# You should call .clone() on the resulting tensor if you plan on modifying it
# https://discuss.pytorch.org/t/very-strange-behavior-change-one-element-of-a-tensor-will-influence-all-elements/41190
mask = mask_miss.expand_as(sxing).clone()            # type: torch.Tensor
mask[:, :, -2, :, :] = 1   # except for person mask channel
2. 损失计算图因为Pytorch的动态机制越来越大,直到耗尽内存
摘录自
常见的原因有
在循环中使用全局变量当做累加器,且累加梯度信息
举个例子,下面的代码中
total_loss=0
for i in range(10000):
  optimizer.zero_grad()
  output=model(input)
  loss=criterion(output)
  loss.backward() # 计算的梯度自动叠加到各个权重的grad上,并且计算完成后销毁计算图!!!
  optimizer.step()
  total_loss+=loss
  #这里total_loss是跨越循环的变量,起着累加的作用,
  #loss变量是带有梯度的tensor,会保持历史梯度信息,在循环过程中会不断积累梯度信息到tota_loss,占用内存
以上例子的修正方法是在循环中的最后一句修改为:
total_loss+=float(loss)
或者 total_loss += loss.item() # tensor.item()是取张量的python数值
利用类型变换解除梯度信息,这样,多次累加不会累加梯度信息。
局部变量逗留导致内存泄露
局部变量通常在变量作用域之外会被Python自动销毁,在作用域之内,不需要的临时变量可以使用del x来销毁。
list数据类型,不断append增长了计算图大小
3. Pytorch中的Batch Normalization layer踩坑
详情查看我的另一篇博客:https://blog.csdn.net/xiaojiajia007/article/details/90115174
4. 优化器的权值衰减weight_decay项导致的隐蔽bug,即是的网络的权值不断减少至0
摘录自:https://zhuanlan.zhihu.com/p/91485607
我们都知道weight_decay指的是权值衰减,(注意:权值衰减不等价于在原损失的基础上加上一个L2惩罚项! 具体说明见下面那条笔记),使得模型趋向于选择更小的权重参数,起到正则化的效果。但是我经常会忽略掉这一项的存在,从而引发了意想不到的问题。
这次的坑是这样的,在训练一个ResNet50的时候,网络的高层部分layer4暂时没有用到,因此也并不会有梯度回传,于是我就放心地将ResNet50的所有参数都传递给Optimizer进行更新了,想着layer4应该能保持原来的权重不变才对。但是实际上,尽管layer4没有梯度回传,但是weight_decay的作用仍然存在,它使得layer4权值越来越小,趋向于0。后面需要用到layer4的时候,发现输出异常(接近于0),才注意到这个问题的存在。
虽然这样的情况可能不容易遇到,但是还是要谨慎:暂时不需要更新的权值,一定不要传递给Optimizer,避免不必要的麻烦。
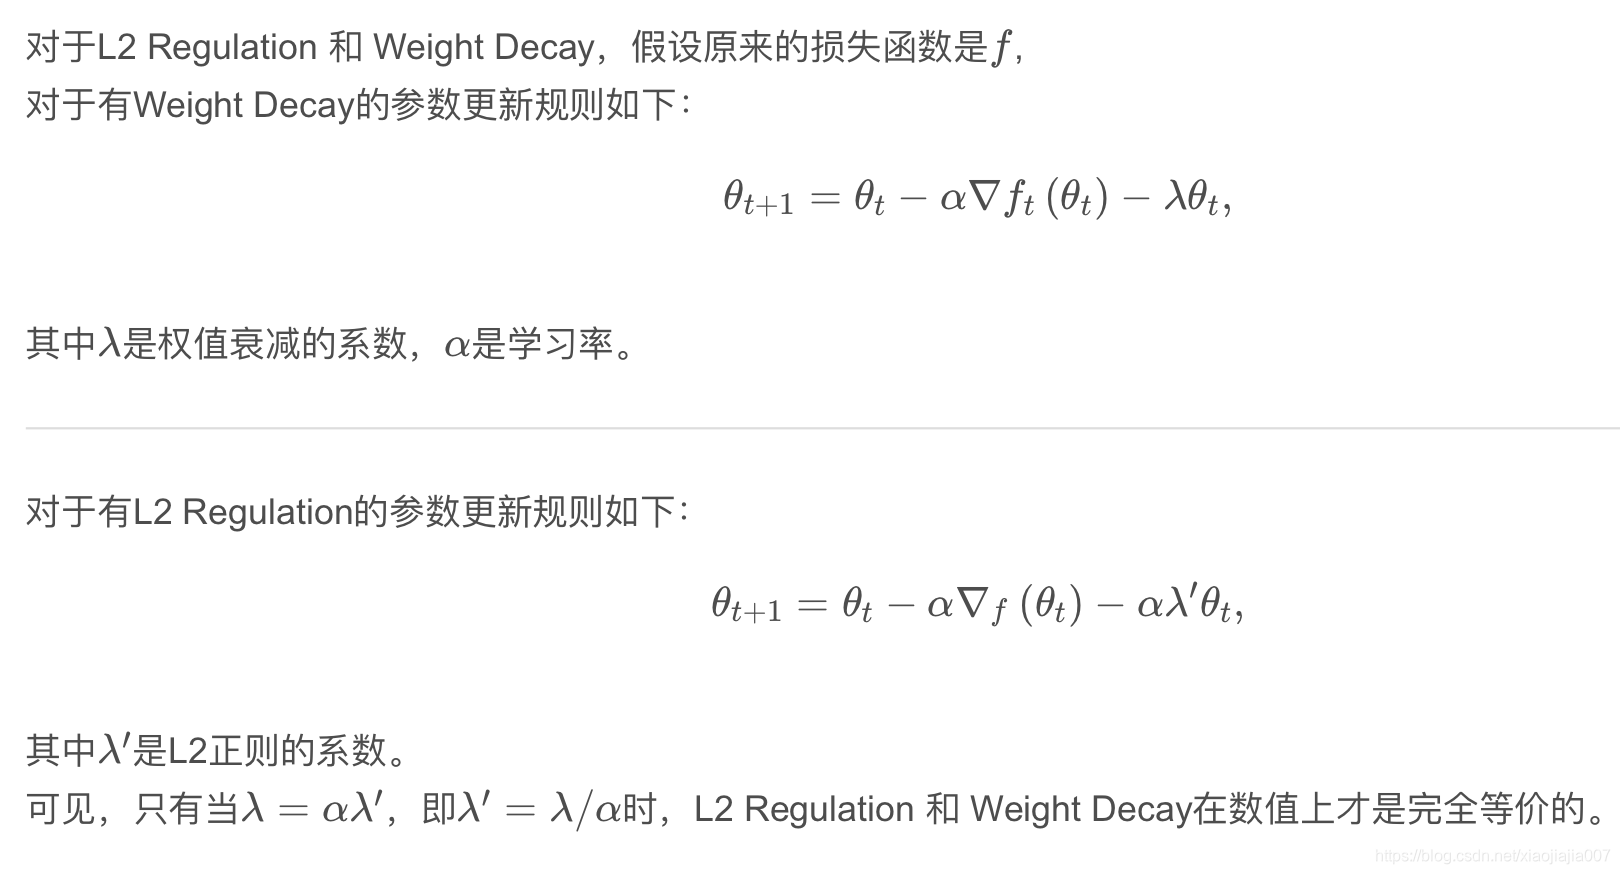
5. L2正则不等于权值衰减
权值衰减(Weight Decay):在网络权值通过损失函数更新后,直接再减去权值本身的一个倍数,可以写成 W(t+1)’ = W(t+1)-W(t);
而 L2正则(L2 Regulation):在原有的算是函数基础上,添加了网络权值平方和*一个倍数,L’ = L+1/2∑w^2,注意在参数更新,对L’求关于某个分量的导数时其他参数视作常数,导数为0。
https://blog.csdn.net/xiaojiajia007/article/details/104045066
在Pytorch中,对于SGD优化器,两者是等效的,但是对于Adam优化器,两者作用有差别,对于Adam会有耦合的错误。
我看到有的开源项目中(链接),SGD使用weight decay,而Adam中没有使用weight decay。
具体分析见下面两个文章:
https://zhuanlan.zhihu.com/p/40814046,
https://zhuanlan.zhihu.com/p/63982470
6. Pytorch中的优化器weight decay默认对bias(偏置)也起作用,不合理
添加偏置是有必要的:
https://zhuanlan.zhihu.com/p/158739701
一般来说,我们只会对神经网络的权值进行正则操作,使得权值具有一定的稀疏性[21]或者控制其尺寸,使得其不至于幅度太大,减少模型的容量以减少过拟合的风险。同时,我们注意到神经网络中每一层的权值的作用是调节每一层超平面的方向(因为
就是其法向量),因此只要比例一致,不会影响超平面的形状的。但是,我们必须注意到,每一层中的偏置是调节每一层超平面的平移长度的,如果你对偏置进行了正则,那么我们的
可能就会变得很小,或者很稀疏,这样就导致你的每一层的超平面只能局限于很小的一个范围内,使得模型的容量大大减少,一般会导致欠拟合[7]的现象。
解决方法不止一种
例如进行weight和bias参数过滤:https://www.cnblogs.com/lart/p/10672935.html
1 | self.opti = optim.SGD( |
7. torch.sqrt()在0处的左导数没有定义,会返回nan,换用 torch.norm()
例如:
# https://github.com/pytorch/pytorch/issues/2421
# norm = torch.sqrt((x1 - t1)**2 + (x2 - t2)**2)
norm = (torch.stack((x1, x2)) - torch.stack((t1, t2))).norm(dim=0)
8. PyTorch微分数值异常自动检测或debug
参考 torch.autograd.detect_anomaly() - 知乎
可以作为函数调用,也可作为contextmanager,该功能完成两件事:
- 运行前向时开启异常检测功能,则在反向时会打印引起反向失败的前向操作堆栈
- 反向计算出现“nan”时引发异常
在深度学习中,自动微分是训练神经网络的关键技术之一。PyTorch作为一个广泛使用的深度学习框架田,提供了强大的自动微分功能。然而,在处理复杂的模型或计算图时,可能会出现梯度计算错误(例如计算图释放错误)或其他异常(例如nan数值异常)。为了帮助调试这些问题,PyTorch提供了torch.autograd.set_detect_anomaly(True)函数,用于启用自动微分异常检测。
1 | import torch |